Online Selection & Acquisitions
Important! This option is for libraries that have integrated OSA and Library•Solution installations.
Integration of Online Selection & Acquisitions (OSA) and Library•Solution allows your Acquisitions process to mesh seamlessly with your cataloging database.
Integration requires that your institution's libraries and collections OSA activity be "synchronized" with Library•Solution to reflect completed transactions and the status of associated collection items. Synchronization can be performed "manually" or "automatically."
Online Selection & Acquisitions (OSA) also allows you to add individual Libraries to your list, or to revise existing Library information. This includes Collection information.
OSA users with adequate permissions assigned can use the following instructions to perform the tasks available for Integrated Institutions.
See first: PAC Synchronization Defaults
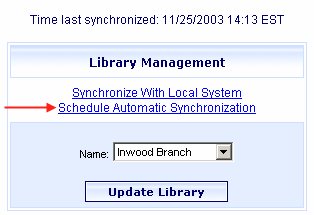
Schedule Automatic Synchronization
The scheduling options are Daily, Weekly, Every "x" days, and, Never (No Automatic Synchronization). Before you begin, determine your choice for scheduling Automatic Synchronization, and also the time of day the Synchronization should take place.
Click the Admin link at the top of the page and the Administration menu displays.
Click Library Resources. The Library Management dialog displays.
Click the Schedule Automatic Synchronization link.
The Schedule Library / Collection Synchronization dialog displays.
In the "AT hh:mm UTC" field, click the drop-down arrow and select the desired time.
Select the appropriate option button. Note: If you click the Weekly option select a day from the drop-down list. If you click the Every "x" days option type the desired number of days between Automatic Synchronizations.
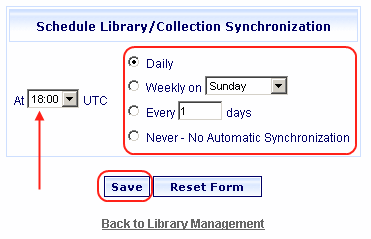
When done, click the Save button.
A message displays The library / collection synchronization schedule has been saved. Click OK.
Manually Synchronize
Click the Admin link at the top of the page and the Administration menu displays.
Click Library Resources. The Library Management dialog for integrated institutions displays.
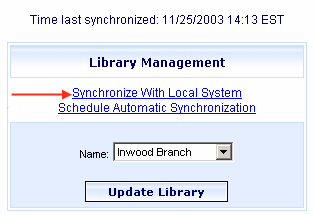
Click the Synchronize With Local System link.
A message dialog displays inquiring if you want to Synchronize with Local System now?
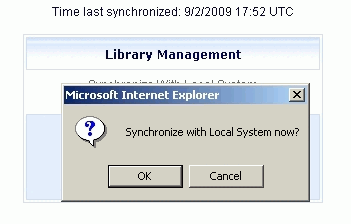
Click OK.
Important! The synchronization process may take a few minutes to complete. A blank white window will display while synchronization is in progress. Please be patient and wait for the completion notice to appear after you click OK.
When the synchronization is complete the window displays a Database Synchronization Results screen. If an error was encountered an error message displays, otherwise the message Database Synchronization Complete displays. Click OK as appropriate.
Add or Update Library Information and Collection Information
When an institution is integrated with Library•Solution, there are fields on the Library Information screen that cannot be edited from the OSA interface because those fields are populated in OSA from the Library•Solution database. To change those fields, or to edit collections, the customer must change the settings via the Library•Solution application and then re-synchronize OSA with Library•Solution.
One setting that can be edited on the Library Information screen is the Library Code. Many libraries use a short library identifier for each branch as "shorthand" within the Library System, (for example; 01 or IR for the Inwood Regional Library and 02 or CH for the Charles Town Community Library). To ensure the 3 x 5 distribution cards print appropriately, a short library identifier must be created in OSA. This setting is established on the Library Information page. Click Admin | Library Resources and select the library you want to update. Type the identifier in the Library Code field. Please note: this short identifier is not used anywhere in OSA, except to print on the 3 x 5 distribution card.
Other settings that can be edited on the Library Information page are: Library Type, Collection Size, and SAN (if known).
View Existing Collections
Click the Admin link at the top of the page and the Administration menu displays.
Click Library Resources. The Library Management dialog displays.
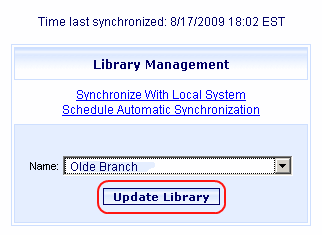
From the drop-down list, select the Library name you want to update.
Click the Update Library button.
The Library Information screen opens displaying the current settings. At this point, if necessary, you can make changes to the available Library Information fields and click the Save button.
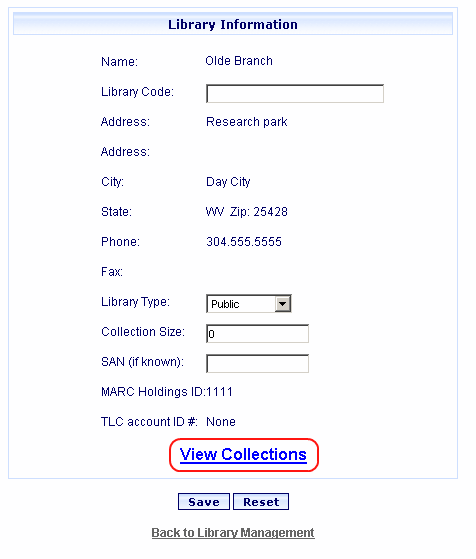
At the bottom, click the View Collections link.
The Library Collections screen displays. Click a column heading to sort the list by the contents of that column.
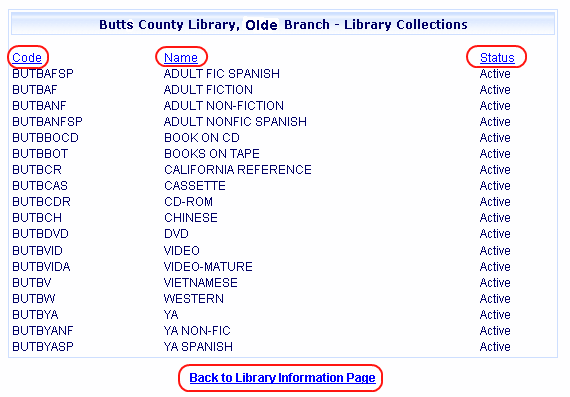
Click the Return to Library Information Page link when done viewing the list.
Return to: Library Information Overview