Online Selection & Acquisitions
Online Selection & Acquisitions (OSA) allows you to add individual Libraries to your list, or to revise existing Library Information. This includes the ability to edit Collection information.
Add a New Library to Your System
Click the Admin link, and the Administration menu displays.
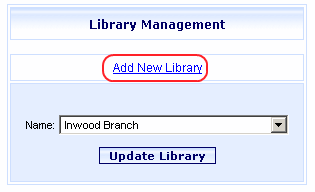
Click Library Management and the Library Management dialog displays.
Click Add New Library. The Library Information screen displays.
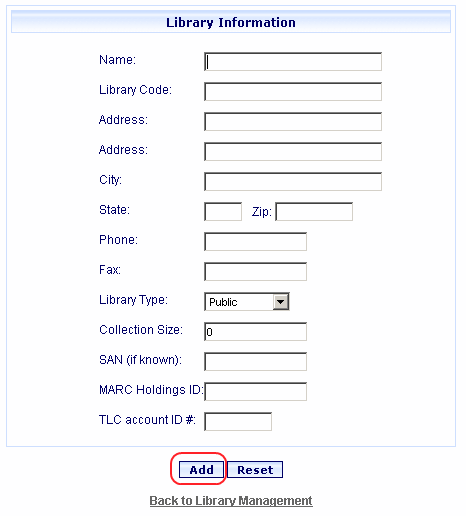
Complete each field of the form. (Name, Address, Phone are required)
Click Edit Collections to add Collection information. (See Collections instructions below.)
Click Add. Click Reset to clear the form.
Repeat steps 1 thru 6 as needed.
Update Library Information
Click the Admin link, and the Administration menu displays.
Click Library Management and the Library Management dialog displays.
From the drop-down list select the Library name you want to update.
Click the Update Library button. The Library Information screen appears with the current settings displayed.
Make the desired changes to the form.
Click the Update button to add this information.
Repeat steps 1 thru 7 as needed.
Add or Update Collection Information
Click the Admin link, and the Administration menu displays.
Click Library Management and the Library Management dialog displays.
From the drop-down list select the Library name you want to update.
Click the Update Library button.
The Library Information screen displays with the current settings displayed.
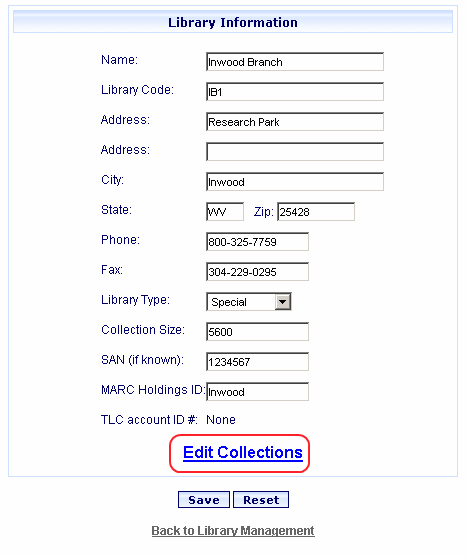
Click the Edit Collections link.
The Library Collections screen displays.
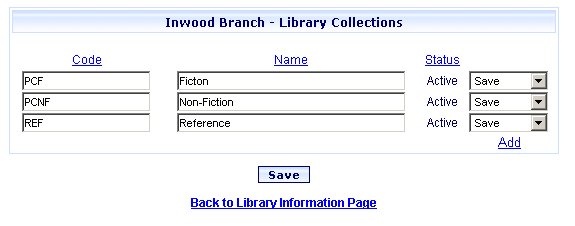
Note: The Collections list can be sorted by Code, Name, or Status. Click the underlined column heading to sort by those criteria. To reverse the order of the sort, click the column heading again.
Edit, Delete, or Retire Existing Collections
Locate the Collection you want to modify. Make changes as necessary to the code or name.
If you are editing the collection, select Save in the drop-down window for the collection.
Note: To Delete or Retire a Collection, select Delete or Retire as appropriate from the drop-down list
.
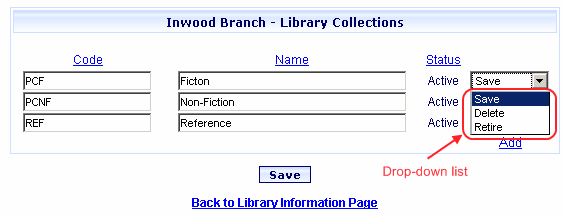
When done, click the Save button at the bottom.
A message confirms the Collections were saved. Click OK.
Add a Collection
To add an additional collection, click the Add link at the bottom right of the display.
A new row is added to the list
.
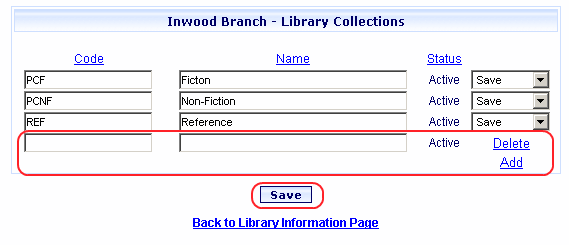
Type the new collection Code and Name.
Ensure Save is displayed in the drop-down window for the collection.
Repeat Steps 1-4 as necessary. Ensure Save is displayed in the drop-down window for ALL new collections.
When done adding collections, click the Save button at the bottom.
A message confirms the Collections have been saved. Click OK.
Return to: Library Resources Overview