Online Selection & Acquisitions
Online Selection & Acquisitions (OSA) provides the user the ability to configure your search preferences. You can customize the database search list to include only the databases you wish to search, and to establish the search sequence within that list. You can also associate a default vendor with each database.
Note: Once the databases and default vendors have been configured, simply search the databases and add items to your selection lists in the usual manner. Each item added to a list will be automatically set to the vendor associated with the database.
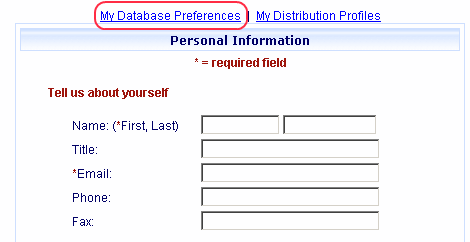
These options are accessible from the My Info link (as shown in the example below), located on the navigation toolbar at the upper-right of the Online Selection & Acquisitions screen.
Access My Database Preferences
Click the My Info link (as shown below) and the Personal Information dialog opens.
![]()
Click the My Database Preferences link.

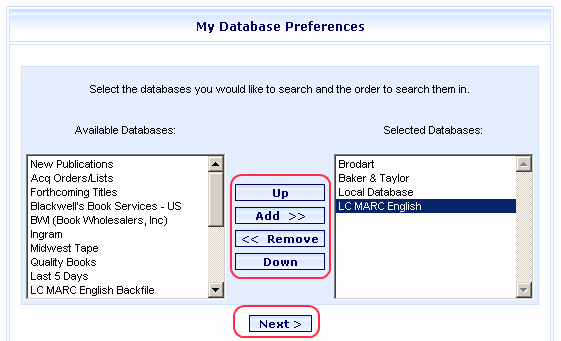
The My Database Preferences dialog opens.

Change Database Preferences Settings
Choose Databases to be Searched
Click the My Database Preferences link and the My Database Preferences opens.
Determine the Database name(s) that you want to be included in your stored search, and will be displayed in the Selected Databases window.
Note: To select multiple database names, press and hold down the CTRL key, then click each database name you want to include.
Use the Add/Remove buttons to move the desired database name(s) to be searched, in or out of the Selected Databases window, as necessary.
When the list contains the desired databases, continue to the following steps; Change the Database Search Sequence if necessary. Otherwise, click Next and proceed to Select a Default Vendor for a Database.
Change the Database Search Sequence
Click a Database name (becomes highlighted) and use the Up/Down buttons to move the selected database up or down in the database list.
When the search sequence is established, click Next and continue with Select a Default Vendor for a Database.
Select a Default Vendor for a Database
The My Database Preferences - Vendor Defaults screen opens.

This screen lists every configured database. Add (or change) the default vendor for each database listed by selecting an entry from the Default Vendor drop-down list. The drop-down list will move from row to row as the mouse is moved over each underlined vendor name or the NO VENDOR notice.
When finished making changes, click Save. Click OK.