Online Selection & Acquisitions
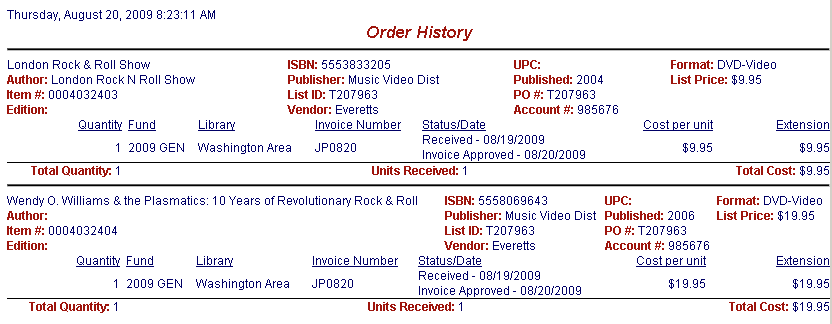
Depending on the settings of the Reports: Own Library, or Reports: Any Library permissions in the User Management Order permissions group, users can generate reports for their own library, or for any configured library. The report will display only those libraries that the logged on user has permission to access. The Order History Report provides detailed information for each order that meets the search requirements. Searches are limited by Library, Fund, Status, or the date the Order Status was last modified.
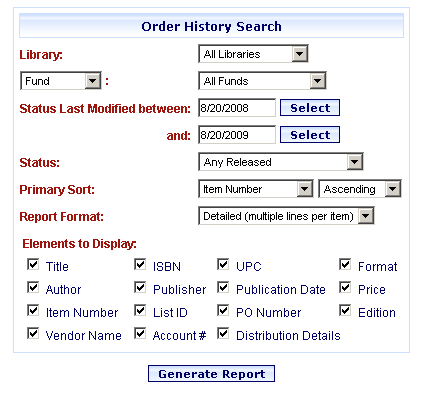
The Report Format option in Step 10 below presents three choices:
Detailed (multiple lines per item)
Summarized / For Printer
Summarized / For Screen (includes links to Item and List details)
If a summary option is selected, another drop-down displays the following three summary options:
Basic
Summary With Funds - For each order, adds a column indicating the # of copies, and the Fund used.
Summary With Libraries - For each order, adds a column indicating the # of copies, and the Library getting the item(s)
Generate an Order History Report
Click the Admin link at the top of the OSA screen. The Administration menu opens.
Under the Reports heading, click Order History.
The Order History Search dialog opens. If you choose to accept the default settings, go to Step 11. Otherwise, continue to Step 4, making changes as desired.
From the Library drop-down list, select the desired Library, or select All Libraries.
From the Fund/Fiscal Year drop-down list (to the left), select the desired option, Funds or Fiscal Year.
If you chose Funds, from the drop-down to the right select a Fund, or select All Funds.
Note: The drop-down Fund list will only display funds that the logged on user has been authorized to access.
If you chose Fiscal Year, from the drop-down to the right select a Fiscal Year.
In the Status Last Modified between box, type the desired starting date in mm/dd/yyyy format, or click the Select button to view a calendar to select a date from.
In the (Status Last Modified between) and box, type the desired ending date in mm/dd/yyyy format, or click the Select button to view a calendar to select a date from.
From the Status drop-down list select the desired Status, or select Any Released.
In the two drop-down lists to the right of Primary Sort, first select the desired sort option, and then whether you want the list displayed in Ascending, or Descending order.
From the Report Format drop-down select the desired format. If a summary option is selected, select the desired option from the Summary Format drop-down.
NOTE: If the Summary/For Screen option is selected, the Print dialog does not display when the report is generated.
From the Summary Type drop-down, select the desired Summary type.
Elements to Display: Select the elements you want to display on the report.
When all selections are made, click Generate Report.
The Order History report displays. The displayed format depends on the Report Format selection made when configuring the report. Except as noted above, a Print dialog also displays. Click Print.