Online Selection & Acquisitions
The Online Selection Assistant allows users who are assigned adequate permissions, the ability to add, modify, and delete Special Charges or Credits, to be used in conjunction with Invoice Management.
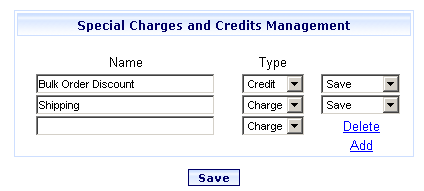
Access Special Charges and Credits Management
Log in to OSA with a Username granted adequate permissions to Maintain Special Charges information.
Click the Admin link and the Administration menu displays.
Click the Special Charges / Credits Management link and the Special Charges and Credits Management dialog opens.
Add a new Special Charge, or Credit
Click the Add link. A new row is added to the list. A Delete option displays to allow you to remove the new row if you have not yet clicked Save.
Type a Name for the Charge or Credit.
Select the Type from the drop-down list. Either Charge or Credit.
When done, ensure Save is displayed in the drop-down list to the right, then click the Save button.
You will be advised that Special Charges and Credits have been updated. Click OK.
Modify a Current Special Charge, or Credit
Locate the Charge or Credit Name you want to modify.
Change the name as desired.
Change the Type by clicking the drop-down list and selecting the desired type. Either Charge or Credit.
When done, ensure Save is displayed in the drop-down list to the right, then click the Save button.
You are advised Special Charges and Credits have been updated. Click OK.
Delete an Existing Special Charge or Credit
Locate the Charge or Credit Name that you want to delete.
Select Delete from the drop-down menu to the far right, then click the Save button.
You are advised Special Charges and Credits have been updated. Click OK.
The Special Charges and Credits Management screen re-displays the updated list of Charges and Credits.