Online Selection & Acquisitions
Important! This option is only for libraries with separate Invoicing and Receiving.
The purpose of the Completed Shipments Queue is to provide a control mechanism for managing receipts. In Online Selection & Acquisitions (OSA), the Completed Shipments option under Invoicing on the Admin menu, provides system administrators, or users with the appropriate Administrative permissions the ability to generate a list of shipments (Packing Slip Receipts) that have been completely received and are ready for invoicing.
Note: This option is only displayed when the Separate Invoicing and Receiving option is selected on the Library System Information page under Invoicing / Receiving.
About the List
From the Packing Slip Receipts list you can:
Click the underlined Packing Slip Number to view a list of the items and to begin adding those items to an Invoice.
REOPEN a Completed Packing Slip to add to, or edit, the items on the Packing Slip.
View Completed Shipments
Log in to OSA with a Username granted adequate permissions to work with invoices.
Click the Admin button and the Administration menu opens.
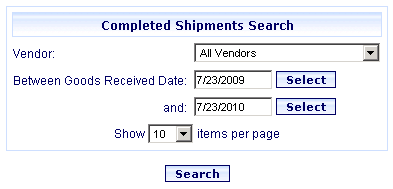
In the Invoicing section, click the Completed Shipments link. The Completed Shipments Search dialog opens, as shown below.

From the Vendor drop-down, select the Vendor associated with the packing slip you want to work with.
In the Between Goods Received Date / and boxes, type the appropriate dates, or click the Select button to view a calendar to choose each date from.
From the Show x items per page drop-down list, select the number of items you want displayed on each results page.
Click the Search button. The list of Packing Slip Receipts displays, as shown below, displaying a list of the completed shipments.

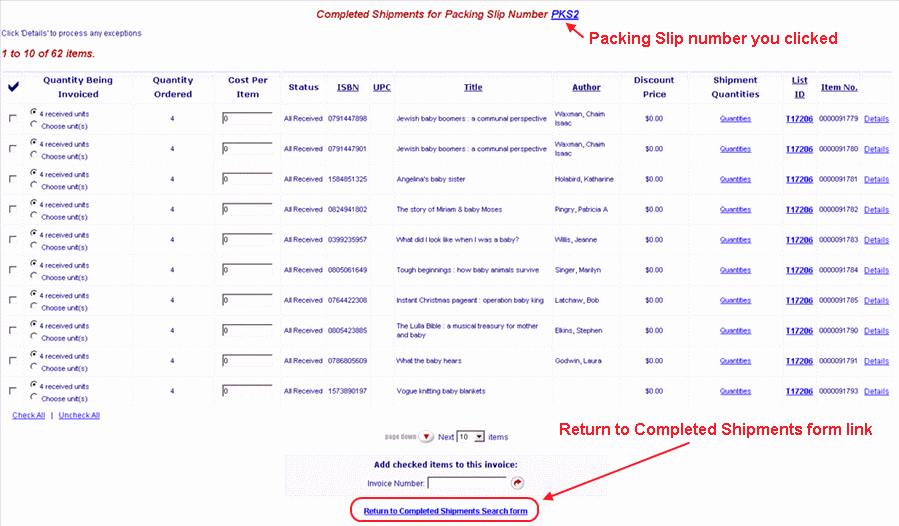
Click the underlined entry in the Packing Slip Number column (PKS2 in this example) and a Completed Shipments for Packing Slip Number nnnnn screen displays the packing slip items.

Select the items you want to add to the invoice, or click Check All to select all items.
Under Add Checked Items to this Invoice type the Invoice Number in the Invoice Number box.
Note: If you do not know the Invoice number, or if there is not an existing invoice number, you should review the information in the Invoice Help topics to determine how to proceed.
Click the rotating red arrow button. The invoice is saved. Click OK.
Click Invoice in the next section below to view information on how to continue handing the Invoice.
Access Invoicing and Receiving Help Topics
See Invoicing Overview for access to the complete set of Invoice Management Help topics.
See Receiving Overview for access to the complete set of Packing Slip Management Help topics.