Online Selection & Acquisitions
Online Selection & Acquisitions (OSA) provides the user the option to Add, Update, Copy, and Delete Distribution Profiles. The profiles are used to pre-determine the distribution of the ordered items when they are received. Each Distribution Profile contains Fund, Library, Collection, and Quantity information.
See Also: Options For Checked Items
Important! Keep in mind that closure or deletion of a Fund, branch location closures, and permission changes for staff users could make the default profile invalid. If there is a problem with the profile, it will not be applied.
Navigate the following sections:
Access Distribution Profile Management
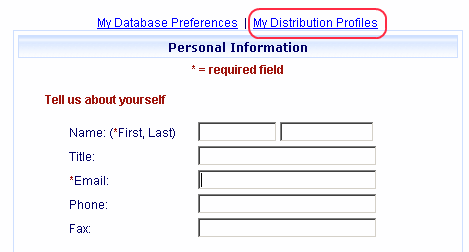
Click the My Info link on the Navigation Toolbar as shown below and the Personal Information page opens.
![]()
Click the My Distribution Profiles link.
The Distribution Profile Management dialog opens. Note: The Set As Default button will not be displayed if there are NO Distribution Profiles configured.
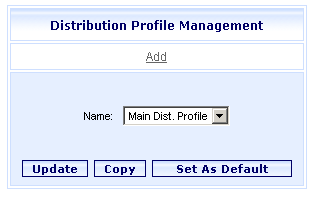
Click the Name drop-down arrow to view the list of existing Distribution Profiles.
You can:
Select the Distribution Profile you want to work with from the Profile Name drop-down list and click the Update or Copy button as appropriate.
Click the Add link to create a new Distribution Profile.
See the sections below to help you work with performing the available Distribution Profile functions.
Change the Sequence of the rows in a Distribution Profiles List
When multiple rows are displayed within a Distribution Profile, users have the ability to customize the sequence of the rows.
Open the Distribution Profile you want to work with.
In the row you want to move, place your mouse pointer over the up/down green arrow symbol (![]() ) in the Move column to the left. The mouse pointer will turn into a four-direction arrow.
) in the Move column to the left. The mouse pointer will turn into a four-direction arrow.
Left-click and continue holding the mouse button down while dragging the row to the desired position in the list.
Release the mouse button.
Continue moving rows as desired. When done, click the Save button and then click OK..
Click the My Distribution Profiles link and the Distribution Profile Management screen opens.
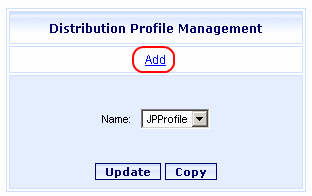
Click Add, as shown above, and the Distribution Profile Setup screen opens.
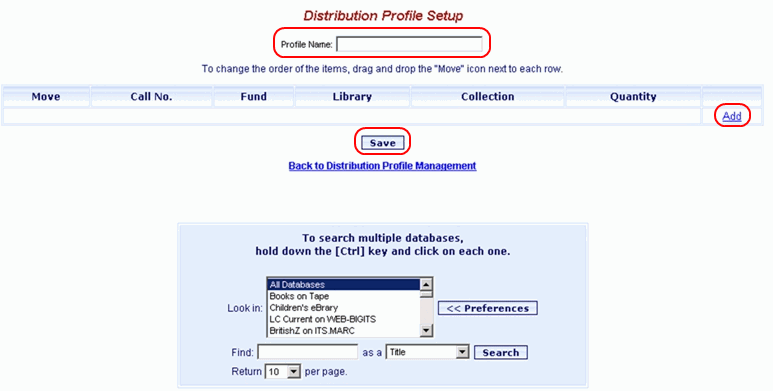
In the Profile Name box, type a Profile Name.
Click Add and the Distribution Profile fields displays.
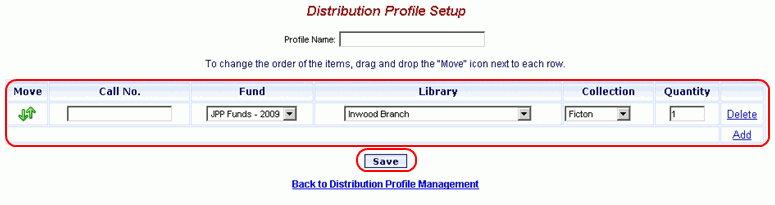
If desired, type the Call Number you want to display when this Distribution Profile is applied to a specific order.
Using the drop-down lists, select a Fund, Library, and Collection from the choices that display.
Type the number of copies in the Quantity box.
As necessary, click Add again, enter the Call No., and select the Fund, Library, Collection, and Quantity selections for each entry in the profile.
When done, click Save. You are advised the profile has been saved. Click OK.
Click the My Distribution Profiles link and the Distribution Profile Management screen appears.
From the Name drop-down list, select the Profile Name you want to modify.
Click the Update button and the Distribution Profile Setup screen displays.
If desired, type the Call Number that you want to display when this Distribution Profile is applied to a specific order.
Using the drop-down lists, change the Fund, Library, and Collection as desired, from the choices that display.
If desired, change the number of copies in the Quantity box.
Add or remove rows from the Distribution Profile by clicking the Add, or Delete links to the right, and making the Fund, Library, Collection, and Quantity selections for each entry added to the profile.
When done, click Save. You are advised the profile has been saved. Click OK.
Set the Default Distribution Profile
When items are added to a list, the Default Distribution Profile's settings will be automatically applied to each item. You can replace the automatically applied distribution settings by using the Apply Distribution Profile option on the Options for Checked Items drop-down list to apply a different Distribution Profile to the selected items. You can also change the settings manually by using the distribution settings under the Options for Checked Items dialog.
Important! Keep in mind that closure or deletion of a Fund, branch location closures, and permission changes for staff users could make the default profile invalid. If there is a problem with the profile, it will not be applied.
Click the My Distribution Profiles link and the Distribution Profile Management screen will appear.
From the Name drop-down list, select the Profile Name you wish to set as the default Distribution Profile.
Click the Set As Default button.
Note: When the default Distribution Profile is shown in the Name drop-down box, a Remove As Default button will be displayed on the Distribution Profile Management dialog. When a non-default Distribution Profile Name is shown, the Set As Default button displays.
Click the My Distribution Profiles link and the Distribution Profile Management screen appears.
From the Name drop-down list, select the Profile Name you want to copy.
Click the Copy button and the Distribution Profile Setup screen displays, with a blank name field.
Type a name for the copied profile in the Profile Name box.
If desired, type the Call Number that you want to display when this Distribution Profile is applied to a specific order.
Using the drop-down lists, change the Fund, Library, and Collection as desired, from the choices that display.
If desired, change the number of copies in the Quantity box.
Add or remove rows from the Distribution Profile by clicking the Add, or Delete links to the right, and making the Fund, Library, Collection, and Quantity selections for each entry added to the profile.
When done, click Save. You are advised the profile has been saved. Click OK.
Click the My Distribution Profiles link and the Distribution Profile Management screen appears.
From the Name drop-down list, select the Profile Name you want to delete.
Click the Update button and the profile's Distribution Profile Setup screen displays.
Click the Delete button.
You are asked to confirm you want to delete this profile. Click Yes.
You are advised the profile is saved. Click OK.
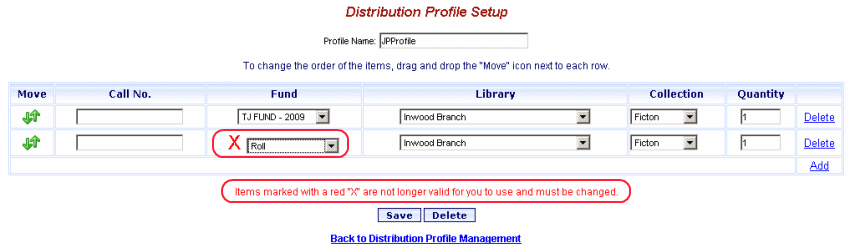
Error Applying a Distribution Profile: When applying Distribution Profiles you may encounter an error advising the Distribution Profile could not be applied and stating Please Update the Profile for More Details. This indicates a problem with a setting in the Distribution Profile.
See To Modify a Distribution Profile earlier in the topic for instructions on how to modify (update) the profile you are trying to use. When the Distribution Profile is displayed the problem area should be marked with a red X and a note above the Save / Delete buttons will provide details about the error, as shown in the example below. Correct the problem and return to this process.
( Top of Page )