Online Selection & Acquisitions
The Order History Report provides detailed information for each order that meets the search requirements. Searches are limited by Library, Fund, Status Last Modified (date range), and Status. The report can be sorted in ascending or descending order, by Title, ISBN, UPC, Item Number, Status, Status Date, List ID, PO Number, Vendor, and Vendor Account #.
Users with the Order: Reports - Any Library and/or Order: Reports - Own Library permissions set in the Admin Order permissions group will see the Order History Report option.
Users with the Order: Reports Configuration permission set in the Admin Order permissions group can customize the display of the various elements of the Order History reports, using the following instructions.
Customize the Order History Report
Click the Admin link at the top of the OSA screen. The Administration menu opens.
Under the Reports heading, click Order History Report Setup.
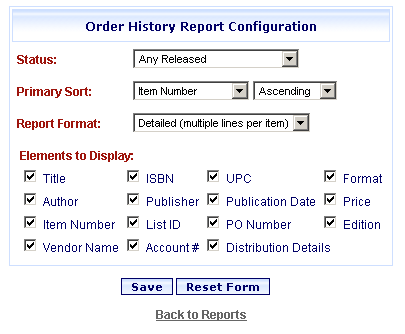
The Order History Report Configuration dialog opens.
For each of the drop-down menus (listed below), select the entry you want to display by default when the Order History Search dialog opens
Status
Primary Sort - Select whether to display in Ascending or Descending order.
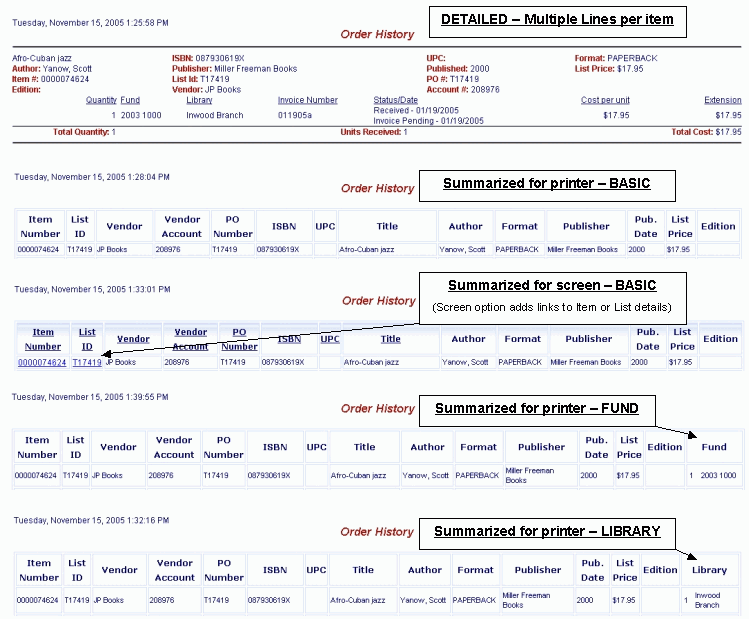
Report Format - To help you determine which format you want to use, see the Order History Report Format Examples at the end of this topic.
Summary Type - Displays only when a summary format is selected as the Report Format.
NOTE: If the Summary /For Screen option is selected, the Print dialog will not display when the report is generated.
Under Elements to Display, select the check box to the left of each report element you want checked by default when the Order History Search dialog opens.
TIP: Click the Reset Form button to return the drop-down and element settings to the settings originally displayed in this session.
When done making selections, click the Save button.
You are advised Order History Report Configuration settings have been saved. Click OK.
See Order History Report to learn how to generate a report.
Order History Report Format Examples