Online Selection & Acquisitions
The Online Selection & Acquisitions (OSA) Vendor Management function provides system administrators, or users with the appropriate Administrative permissions, the ability to add, delete, update, or copy vendor configurations, which include contact information, and Electronic Data Interface (EDI) options for electronic ordering.
Access Vendor Management
Logon to OSA with a Username granted adequate permissions to add users or revise vendor information.
Click the Admin link and the Administration menu will appear.
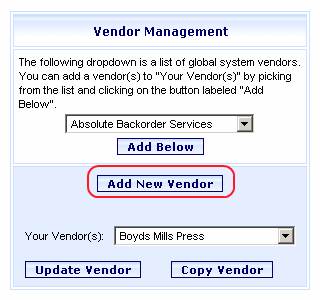
Click the Vendors link and the Vendor Management screen will open, as shown in the Add a New Vendor section below
See the following sections to Add, Update, Copy vendors, and to add vendors to the Your Vendor's drop-down list.
Add a New Vendor
Click the Add New Vendor button. The Vendor Configuration form will display.
Complete as many fields as possible for each section of the form. Click a linked section name below to open a Help topic to assist you with completing that section. There are links in each topic to return to this topic.
General - Information regarding Vendor Name, Vendor Ref, Telephone, Fax, Claims and Cancels settings, discount percentage, and notes.
When all of the above sections have been completed click the Save Vendor button at the bottom of the page.
Update an Existing Vendor
Refer to the General / Users / Address / EDI links in Step 2 above for access to information about each section of the form.
On the Vendor Management dialog, from the Your Vendor(s) drop-down list, select the name of the Vendor you want to update, as shown in the example below.

With the name of the Vendor you want to updated displayed in the Your Vendor(s) drop-down window, click the Update Vendor button, as shown in the example above.
As appropriate, make changes to any of the displayed information.
When finished click the Save Vendor button.
Copy an Existing Vendor
Refer to the General / Users / Address / EDI links in Step 2 of the Add a New Vendor procedure above for access to information about each section of the form.
On the Vendor Management dialog, from the Your Vendor(s) drop-down list, select the name of the Vendor you want to copy.
With the name of the Vendor you want to copy displayed in the Your Vendor(s) drop-down window, click the Copy Vendor button.
The Vendor Configuration form will open. Most of the General section will be empty to allow you to enter the new vendor information. The information in the Users / Address / EDI sections will be retained.
Type a vendor name for the copied information in the Vendor Name box.
As appropriate, make changes to any of the displayed information.
When finished click the Save Vendor button.
Add a Vendor to the Your Vendor(s) drop-down list
Locate and select the desired vendor from the drop-down list in the top section of the Vendor Management dialog (above the Add Below button), as shown below.
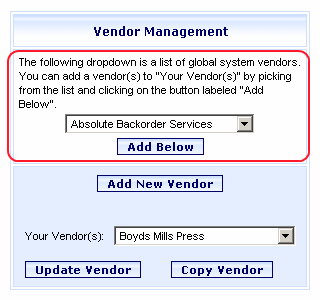
When the desired vendor is displayed click the Add Below button.
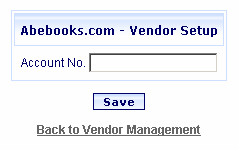
A Vendor Setup up dialog displays. Type the appropriate account number for this vendor and click Save.
A confirmation message will advise the vendor has been saved. Click OK.
The vendor will now be displayed on the Your Vendor(s) drop-down list.