Online Selection & Acquisitions
Online Selection & Acquisitions (OSA) searches returns a scrollable search result list of items that match your search criteria. You can select one or more items to add to the desired list.
You can also add an item to a selection list using Original Entry Cataloging. See the instructions at the bottom of this topic. Note: When adding items using original entry it is to your advantage to provide as much standard number information as possible, to avoid ordering a more expensive copy of an item than was intended.
Add Items to a List Awaiting Review
You can now add items to a list that has a status of Awaiting Review Level X. You must have a Review Level assigned to your user account that is equal to the X in the Awaiting Review Level X in the Status. For example, if the list Status is Awaiting Review Level 2, to add items to that list you must be logged in as a user assigned a Review Level of 2. To add items, locate the list on the Awaiting Review list of lists and select the Review option. Then open the list from your My Review list of lists. Add items to the list as you would normally and then proceed appropriately. You can Order the list, or submit to the next level of review, as appropriate.
Before You Begin
Once you have a search result, a list must exist before you can add any items to it. See the Create a New List topic.
Add an Item to a List (from a search result list)
Using the options on the OSA Toolbar perform a Quick, New, or Advanced search for the desired title or subject. With the New Search option you can limit the search by selecting a limiting option from the as a drop-down list. The options are: Title, Author, Subject, ISBN, LCCN, ISSN, UPC, Dewey Call, LC Call, Local Call, Music Number, GPO Number, SUDOC Number, Report Number.
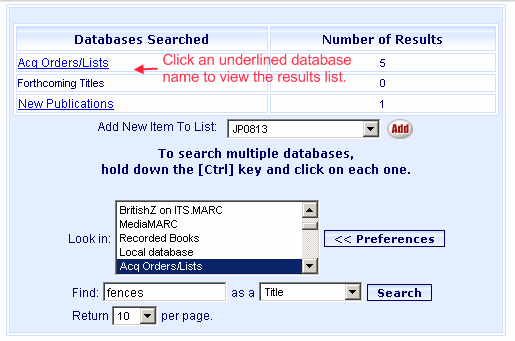
If you search multiple databases, the search result screen will display a list of the databases searched and the number of results for each one, as shown in the example below.

Click the underlined name of the database to view the search results for that database as shown in the example below.
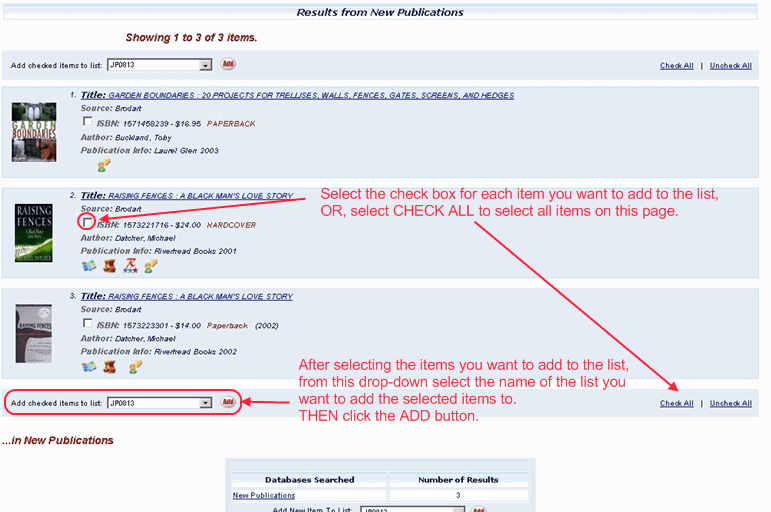
As necessary, scroll through the results screen until you locate a title you wish to add to a list.
Select the check box to the left of the Title you want to add to a list. A check mark will display.
Note: If you wish to add all of the items on the search result to a list, click Check All.
When you reach the end of the search results list, ensure the Add Checked Items to List drop-down list displays the list name that you are working with.
Click the Add button to place all checked items on that database search results list on the displayed selection list.
If duplicate titles are detected a notice will display. Follow the on screen instructions. For handling of Duplicate Item notices see: Duplicate Order Items.
You will be advised that the item(s) has been saved to the list. Click OK.
Repeat these steps for each database on this search result, as desired.
To verify an item has been added to the list, click the My Lists button:
Find the name of the list you saved the item to. The drop-down to the far right displays available options to manage the list, including Print List.
Ensure the drop-down list on the right displays the View option.
Click OK to view the list. To change lists, click the My Lists or List Search button.
Repeat this process for any additional titles you wish to add to your list.
Notes:
Once you have added items to a list, and before the list can be ordered, the Vendor, Fund, Quantity and other details must be established for each item. See To View or Edit a List and the topics listed on the Administration menu for further information.
Distribution Profiles can be used to pre-configure Fund, Library, Collection, and Quantity selections. See My Distribution Profiles which can also be accessed from on the My Info menu to the left.
( Top of Page )
Add an Item to a List using ORIGINAL ENTRY
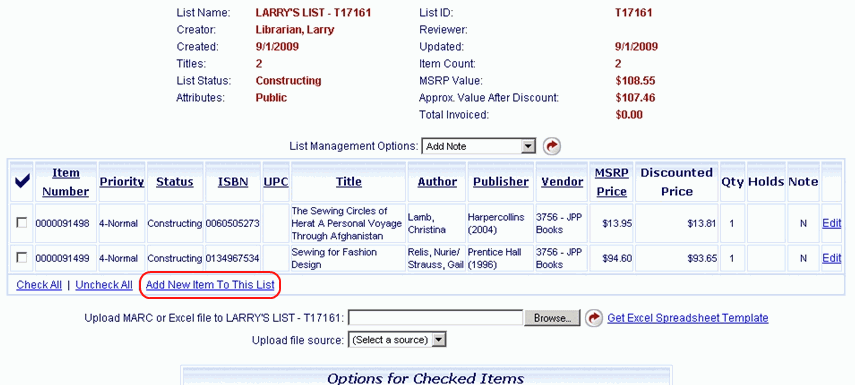
When viewing the List Details screen, click the Add New Item to This List link, as shown circled in the partial screen example below. The List Details screen is accessed by clicking My Lists, then clicking the rotating red arrow button to the right of the View option, for the desired list.
( Top of Page )
OR
On a Search Results listing click the Add button to the right of Add New Item To List. Note: This option is also available if you are viewing the results list of items from a selected database.
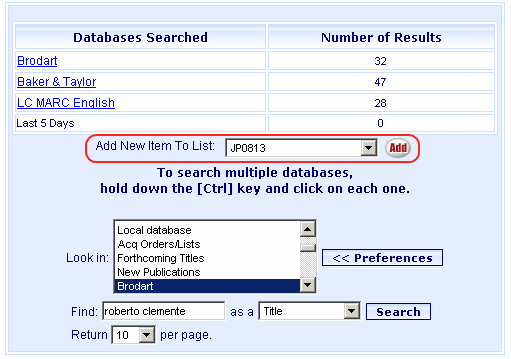
The Original Entry form will display as shown below. The numbered items on the example correspond to the numbered steps in the instructions below the example.
Integrated Institutions: For Libraries with an integrated OSA and Library•Solution setup, if configured on the Page Configuration list (Under Acquisitions Setup on the Administration Menu), a Display In PAC field will display just above the Distribution / Quantity Information heading. Additionally, above the Notes display, a Local Holdings heading will display fields containing the number of Holds, Owned Copies, and Lost/Missing copies. Below the Local Holdings information, if Local Holdings exist for the title, a Circulation Statistics heading will display fields containing the number of Total Circulations, and Circulations This Period.
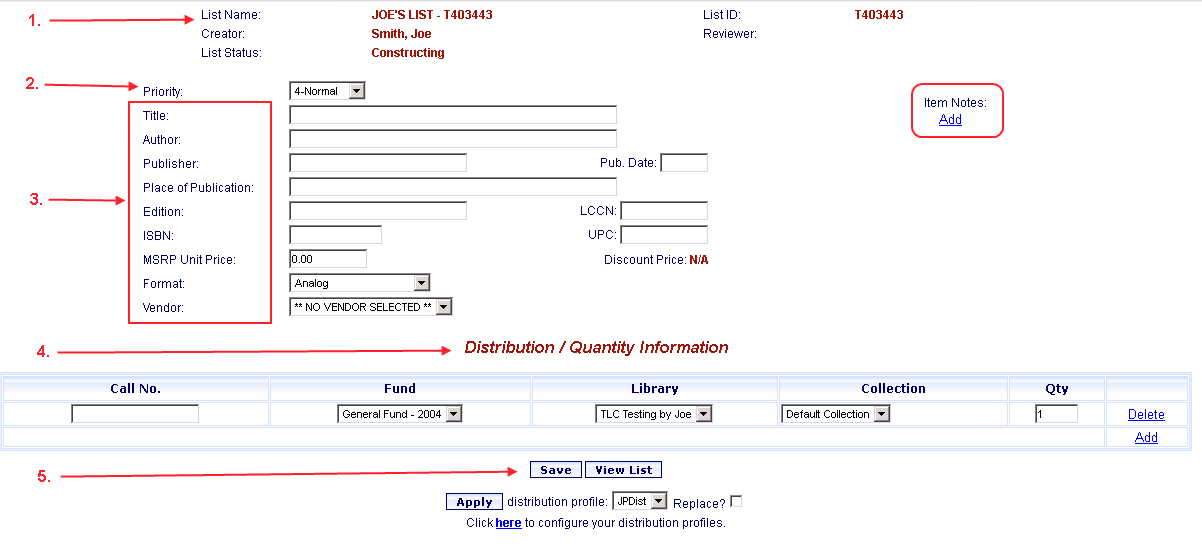
Verify the list name is correct.
Priority: Select the desired Priority for this item from the drop-down list.
Complete each of the following:
Title / Author / Publisher / Pub. Date / Place of Publication / Edition / LCCN / ISBN / UPC - Complete each field as appropriate.
Format: From the Format drop-down list, select the desired format. If Other is selected, a blank entry box will display. Type the format name as desired.
Vendor: From the Vendor drop-down list, select the desired vendor.
Note: For electronic purchase orders only, if you have Library Services Centre (LSC) configured as a vendor, and select their entry from the Vendor drop-down list on the item details screen, a LSC Process As Indicator field will display below the Vendor field.
This field will display a drop-down list from which you must select an option. LSC will not process the order if an LSC Process As Indicator option is not selected.
To the right of the LSC Process As Indicator drop-down a check box labeled Provide MARC Record will be displayed. Select this check box to have LSC supply a MARC record for the title in question.
Changing the Vendor field drop-down selection to a vendor other than LSC will remove the LSC Process As Indicator field from view.
Display in PAC: If the Display in PAC field is available, click the drop-down arrow and choose when to display the item in the PAC. If you want to allow holds for this item select the Allow Holds (if applicable) check box.
Item Notes / Notes to Vendor:
Item Notes: To include an Item Note concerning this title, click the Add button under the Item Notes heading to the right of the Title/Author/Publisher fields. Type your note and continue editing the rest of the fields. To add more Item Notes click the Add button again. Repeat as necessary. There is a 4000 character limit for each note.
Notes to Vendor: The Notes to Vendor field will display once a vendor is selected from the Vendor drop-down list. To add a Note to Vendor that will be included on the purchase order click the Add button under the Notes to Vendor heading. Type your note and continue editing the rest of the fields. To add more notes click the Add button again. Repeat as necessary. There is a 80 character limit for each note.
For Details See: Add a Note to an Item
Distribution / Quantity: Select the appropriate Distribution / Quantity information from the individual drop-down lists, or select a Distribution Profile from that drop-down list located just below the Save / View List buttons.
On the Distribution / Quantity Information table at the bottom, click the Add button. The screen will refresh, displaying Call Number, Status, Fund, Branch, Location, and Quantity. Edit these fields appropriately.
Call Number: Enter the proposed shelving location.
Fund: Select a Fund from the drop-down list.
Library: By default, this field displays the Library assigned to the user's logon. To change this entry, select another entry from the Library drop-down list.
Collection: Select a Collection from the drop-down list.
Quantity (Qty): Type the number of copies of this item that you want to order.
If you desire to order additional copies using different funds, or locations, click the Add button and repeat Step 9 for each additional item.
When done editing, click the Save button.
You will be advised that the item has been saved to the list. Click OK.
The Original Entry form will reappear. Continue adding items as necessary.
Click the View List button to return to the original list.
Note: Items added via Original Entry will have a Control Number prefix of OSA, and can be edited until the list is ordered or the funds are encumbered. If the changes involve bibliographic data the underlying MARC record will be updated.
( Top of Page )
Return to: List Management Overview